Easy Drill To Teach Your Passers To Read The Hitter
Pin this drill diagram! Never lose a volleyball drill again!
Recently I was listening to a volleyball coaching legend, you may have heard of him… Coach Karch Kiraly? (If not, I’ll save you the research: He won a couple of gold medals while playing for team USA (indoor AND beach) and has coached the women’s national team since 2012. He’s kind of a big deal).
So when he was asked what the most important part of volleyball was, my ears perked up. His answer was simple: Learn to read the ball.
This is one of those answers which is simple in theory, but very, very challenging in practice. You can’t just TELL players to read the ball. Heck, half of them probably wouldn’t even know what you meant (and of course, they’d just nod their head and go with it until you called them out).
In order to play volleyball well, you need to anticipate where the ball will go. This has recently become a point of pride for coaches who yell at their teams for diving (they wouldn’t need to dive if they read the ball correctly). Which… they’re not wrong! But we need to make sure we teach players to read and anticipate before we expect them to eliminate any dives or rolls.
FIRST: HOW TO TEACH YOUR PLAYERS TO AIM THEIR HIT
PRIOR to running this drill, I suggest you teach your players how to aim their hit. This can be done quickly through some sort of hitting line drill where players don’t work to hide where they’re trying to hit.
Example: Players face cross-court when they’re trying to hit cross-court, and square-up to the downline shot when they’re trying to hit down the line.
Once players can consistently aim for these two main shots, you’re ready to work on reading the hitter. (As players advance, we’ll work on deceiving the defense. But that works against what we’re trying to teach right now!)
SETUP THE DRILL
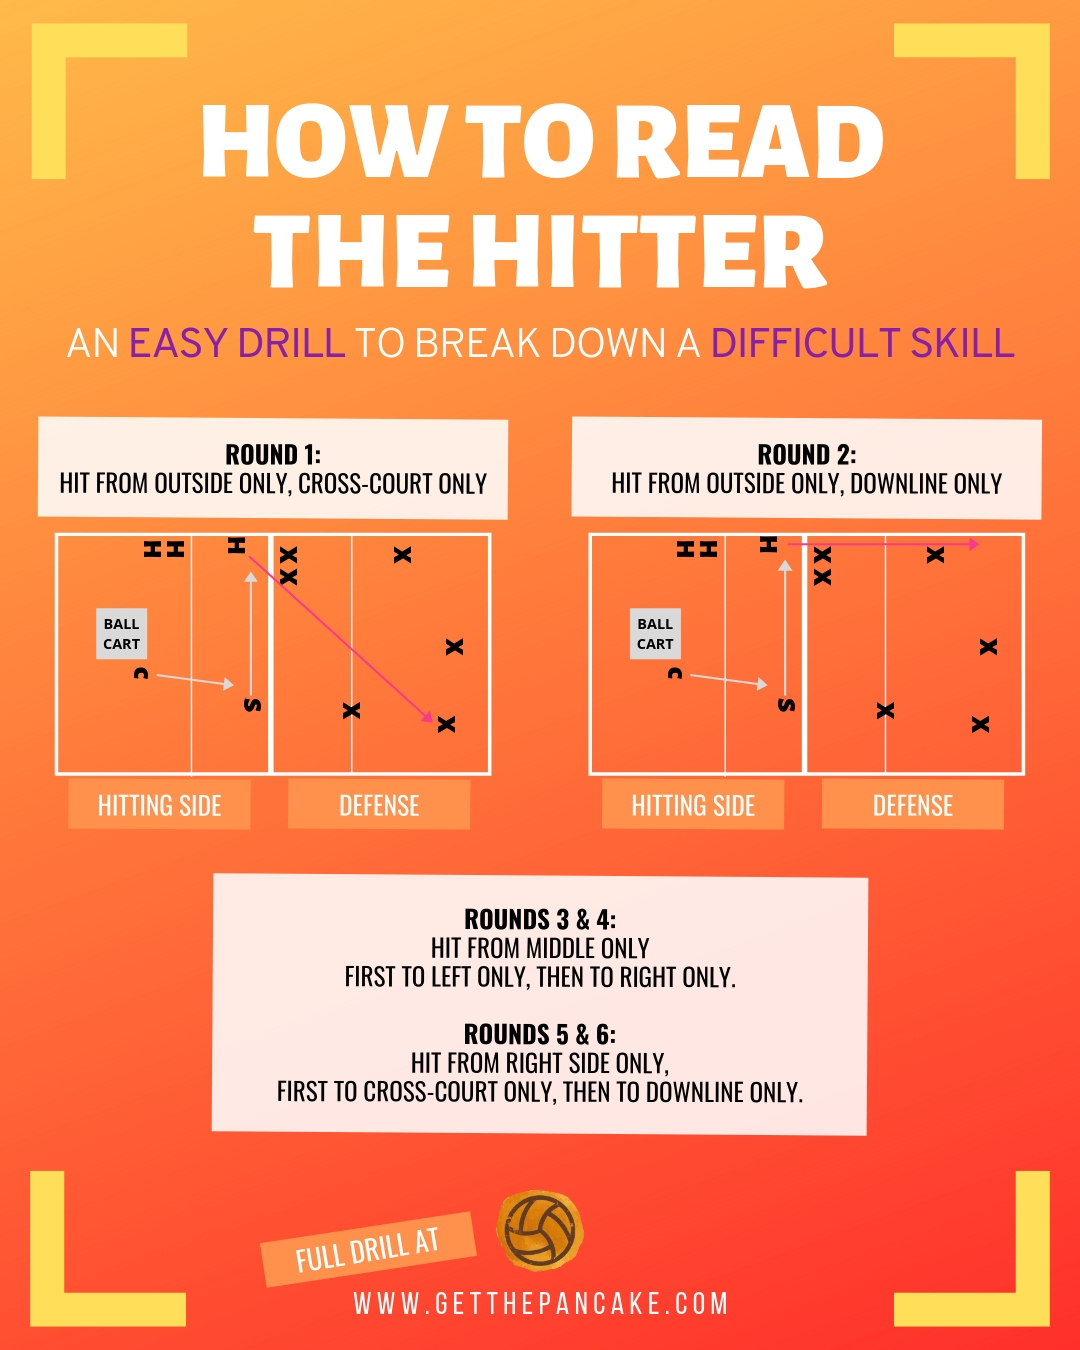
Have your team get into base defense on one side of the net, with a setter and short hitting line on the opposing side of the net. The hitters will ONLY be hitting from outside to start with, and they will ONLY be hitting cross-court. We’ll call this “Outside, Round 1.”
RUN THE DRILL
You can choose to start the play however you prefer, but if this is a very young team lacking significant ball control or a reliable setter, you might want to toss the ball to the hitters (however, I always TRY to get a setter involved, because that’s the only way they’ll get practice).
Otherwise, tossing a ball to the setter from middle back should be fine for now. They’ll set the hitters, and they aim for cross-court only.
After the defense is able to pass three balls to the setter and get them over the net, move on to “Outside, Round 2.” Any hits away from the target should still be played out if possible, but will not count towards the team’s goal of three for the round.
In the next progression, the hitting line will stay hitting from the outside, but they will now aim for downline. The team will not move on until they get three passes up to the setter, and three subsequent hits over the net.
Before moving on to “Middle, Round 1,” you should switch front row/back row on the “defense side” so your hitters and setters on the “hitting side” get a turn playing defense.
Rounds 3 and 4 are essentially the same concept, but from the middle. We can’t hit “cross-court” and “downline” from the middle, so we switch to hitting only left in round 3, and only right in round 4.
After completing these rounds in the same manner (three pass-set-hits’s each round and switching front row/back row), we move on to rounds 5 and 6.
Rounds 5 and 6, we go back to cross-court and downline, but from the right side/opposite position.
DRILL SUMMARY
ROUND 1: Hit from outside to cross-court only until the defense gets 3 pass-set-hit’s over the net.
ROUND 2: Hit from outside to downline only until the defense gets 3 pass-set-hit’s over the net.
SWITCH FRONT ROW/BACKROW BASE POSITIONS AND REPEAT.
ROUND 3: Hit from middle to the left side only until the defense gets 3 pass-set-hit’s over the net.
ROUND 4: Hit from middle to the right right only until the defense gets 3 pass-set-hit’s over the net.
SWITCH FRONT ROW/BACKROW BASE POSITIONS AND REPEAT.
ROUND 5: Hit from right side to cross-court only until the defense gets 3 pass-set-hit’s over the net.
ROUND 6: Hit from right side to downline only until the defense gets 3 pass-set-hit’s over the net.
SWITCH FRONT ROW/BACKROW BASE POSITIONS AND REPEAT.
THIS DRILL WILL TAKE SOME TIME TO COMPLETE. I would anticipate at least 20 minutes or so for more advanced teams, and younger or beginner/intermediate players may need 30 minutes.
You can shorten the drill if your team has a short attention span by changing the defensive goal to 2 “pass-set-hit” combos, or eliminate rounds 5 and 6 if your team doesn’t face right side attacks very often.
WHY THIS DRILL WORKS
When your defense KNOWS that the hit is going cross-court, they will start to notice patterns in the hitters which SHOW that they are going to hit cross-court.
Similarly, they will start to pick up on the DIFFERENCES between a cross-court approach and armswing vs a downline approach and armswing.
Through repetition and attention to the differences in the approach, players will recognize hitter body language sooner, and be able to get into proper defensive position sooner.
Over time, this will lead to a better read on the hitter, and greater anticipation skills from your blockers and passers.


